Keeping your event calendar fresh and accurate is essential—but manually managing events from multiple sources can turn into a time-consuming headache. With The Events Calendar’s Event Aggregator, you can automatically import events from Google Calendar, iCal/ICS feeds, Meetup, and CSV files. Notably, the CSV import tool is even available with the free The Events Calendar plugin, while importing from other services requires the full Event Aggregator license.
Step 1: Master Your Import Settings
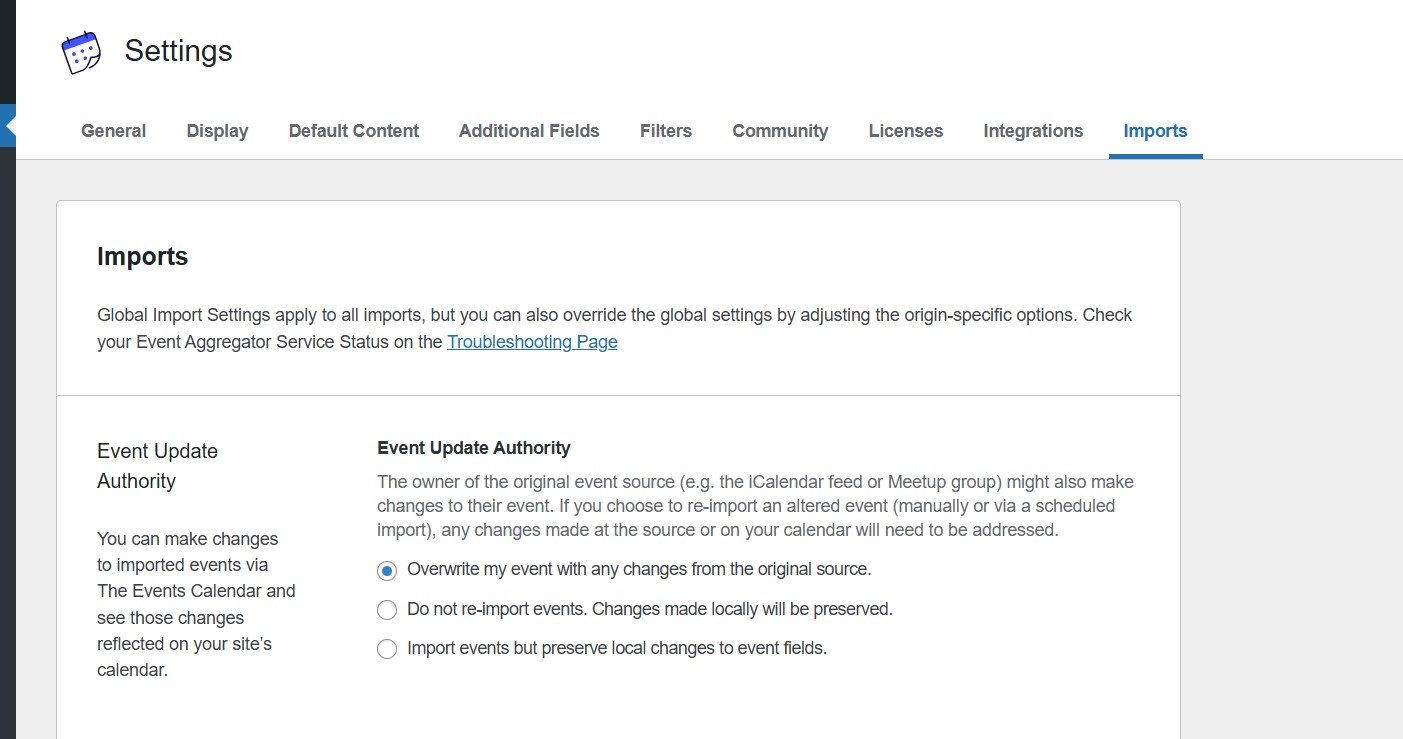
Navigate to Events → Settings → Imports to configure:
Event Update Authority
Defines how imported events are handled when updates occur:
- Overwrite my event with any changes from the original source. — always replace local edits with source changes.
- Do not re-import events. Changes made locally will be preserved. — import only new events, preserving local edits.
- Import events but preserve local changes to event fields. — update only unchanged fields while keeping your custom edits intact.
Global & Source-Specific Settings
- Default status: Published, Draft, Pending Review.
- Default category: Assigns category globally or per source.
- Show Google Map: Map display for imported venues.
- Import limits:
By date range: only events within a set window
By number: cap the number of events per run
Unlimited (not recommended)
Pro tip: Always use a limited import strategy to reduce server load and prevent timeouts.
Step 2: Importing from Specific Sources
A. CSV Files
Since the CSV importer is included with the free The Events Calendar plugin, it’s a great starting point:
- Go to
Events → Importin your WordPress Dashboard. - Select CSV File as the import origin.
- Choose the import type: Events, Venues, Organizers—and even RSVPs or Tickets if applicable.
- Upload your CSV, then click Preview to map columns (e.g., Title → Event Title, Start Date → Event Start Date). Preview to avoid errors.
- Assign default settings: Published, Draft, Pending Review, or Private, and optionally bulk-assign a category.
- Once mapping is confirmed, click Import All to complete.
B. Google Calendar / iCal / ICS Feeds (Premium License Required)
- Add your license and verify it under
Events → Settings → Licenses - Under
Events → Import, select Google Calendar, iCalendar, or ICS File.
Google Calendar uses the public.icslink from calendar settings.
iCalendar covers other calendar services that publish feeds. - Provide your feed URL and select whether this is a one-time or Scheduled Import (hourly, daily, etc.).
- Click Preview to confirm which events will be pulled. Set default status, categories, and venue options.
- Hit Import All or Save Scheduled Import to finalize.
Pro Tip: Use date ranges or event limits to avoid pulling in thousands of events—especially from active calendars.
C. Meetup (Requires Premium License)
- Ensure your Event Aggregator license is active.
- Under
Events → Import, select Meetup as the import origin. - Authenticate via
Events → Settings → Integrationsso Event Aggregator can access your Meetup group or events. - Input the group or specific event URL.
- Select import type: one-time or scheduled.
- Preview, set statuses/categories, and click Import All or Save Scheduled Import.
Step 3: Fine-Tune Your Imports
- Preview Before Importing
Creates a preview of all matching events; you can exclude specific items or adjust settings individually. - Choose Schedule Wisely
Use scheduled imports (hourly, daily) for automatically refreshing events, but adjust your import limit to match server capacity. - Optimize Performance
Use “date range” or “event count” limits to avoid big imports that could timeout or fail.
Final Tips
- Always preview before importing.
- Use sensible limits for import tasks to maintain performance.
- Select the right update authority—Overwrite, Skip, or Merge—based on how much you edit events locally.
With these optimized import strategies, your Events Calendar will stay accurate, well-organized, and high-performing—even when sourcing from multiple platforms.